How to Fold an Origami Crane
The origami crane is the traditional Japanese orizuru, a bird with spread wings folded from a single square without cuts or glue. It is an advanced model: expect about 15 minutes for your first one, mostly spent learning the petal fold and inside reverse fold.
- Difficulty
- Advanced
- Time
- About 15 min
- Steps
- 19
- Paper
- One square of thin origami paper, ideally 15 cm (6 in) on each side
Colored side facing you, fold corner to corner along one diagonal, open it, and repeat along the other diagonal so an X is creased into the sheet.
Tip: swipe the diagram, or use ← → on your keyboard. Space plays and pauses.
All steps
Advertisement
Step-by-step instructions
The same 19 steps as the animation above, written out so you can fold away from the screen.
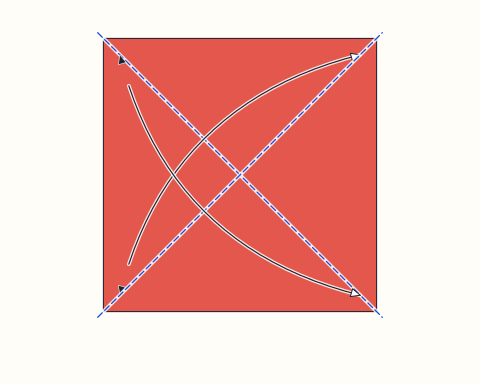
Step 1
Colored side facing you, fold corner to corner along one diagonal, open it, and repeat along the other diagonal so an X is creased into the sheet.
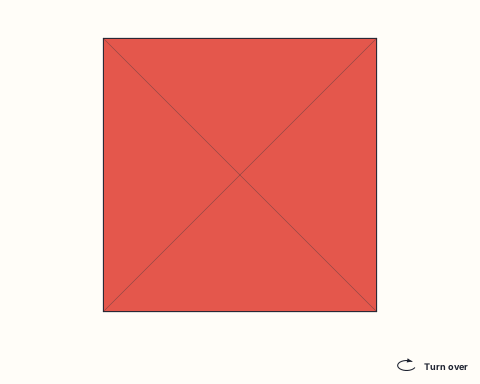
Step 2
Flip the sheet so the white side faces you.
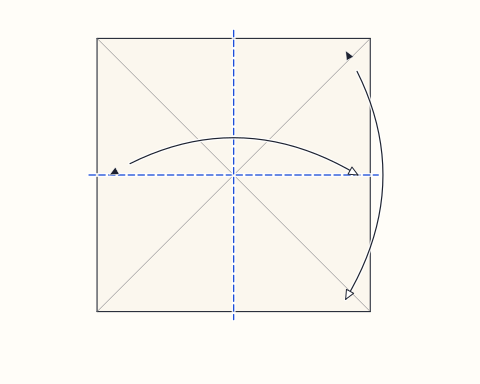
Step 3
Crease both midlines by folding edge to edge, opening the paper after each fold.
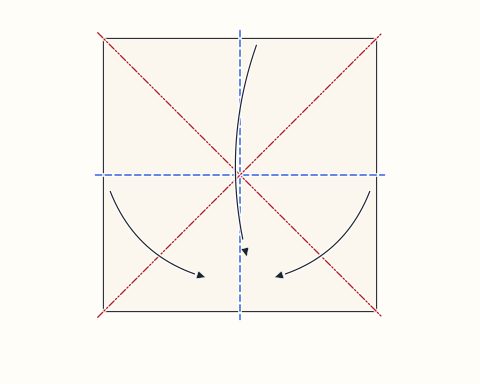
Step 4
Guided by those creases, gather three edges (left, right and top) down onto the bottom edge; the sheet collapses into a small square whose loose corners point toward you. This shape is known as the preliminary base or square base.
Advertisement
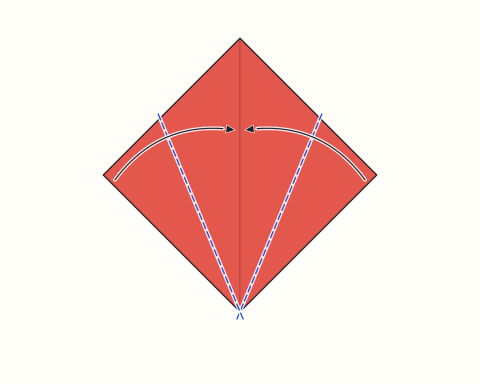
Step 5
Working on the uppermost layer only, swing its two lower slanted edges inward so they lie exactly along the vertical middle crease.
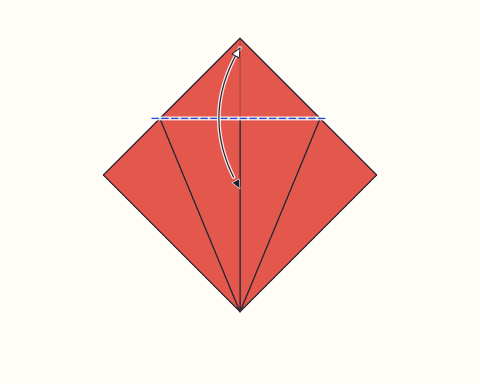
Step 6
Fold the small top triangle down across those flaps, press a sharp crease, then lift it back up.
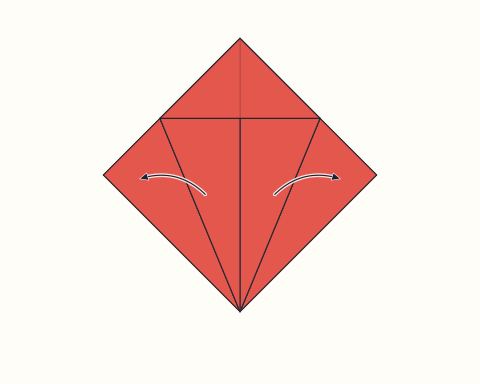
Step 7
Open out the two side flaps you folded in a moment ago.
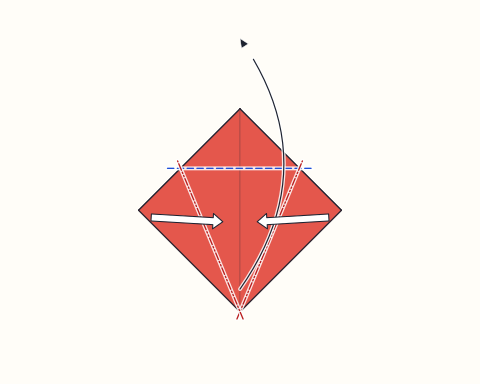
Step 8
Now make the petal fold: raise the bottom corner of the upper layer, hinging it on the horizontal crease from the previous steps. Let the sides swing inward on their creases until they meet at the center, then press everything flat into a tall diamond.
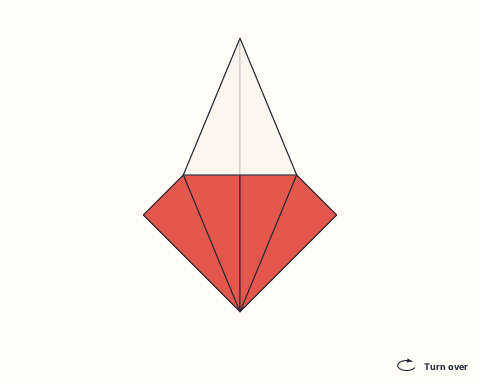
Step 9
Flip the model over.
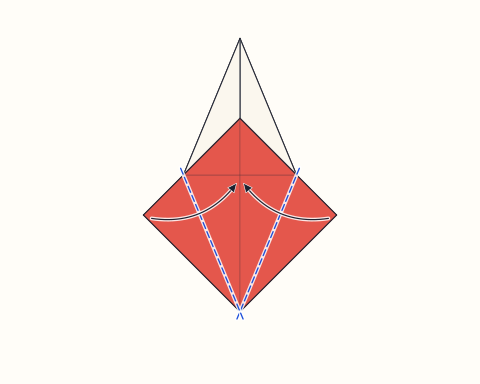
Step 10
On this side, repeat the narrowing move: swing both lower slanted edges of the uppermost layer inward until they sit on the middle crease.
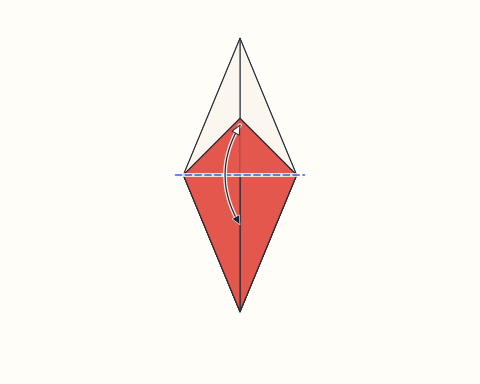
Step 11
Once again, bring the little top triangle down, sharpen the fold, and lift it back into place.
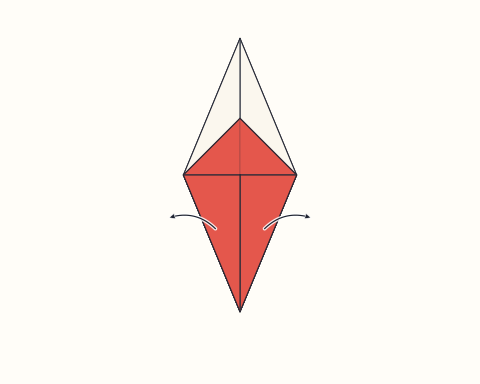
Step 12
Release the two side flaps again.
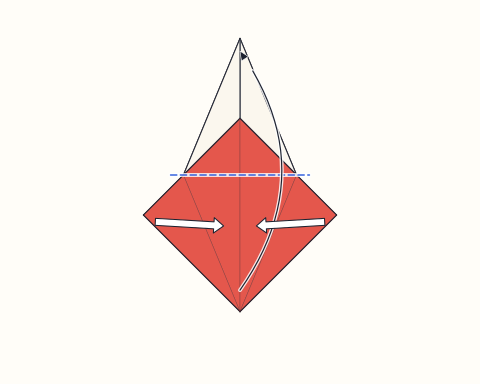
Step 13
Complete a second petal fold on this side. The result is the bird base, with two narrow flaps above and two split flaps below.
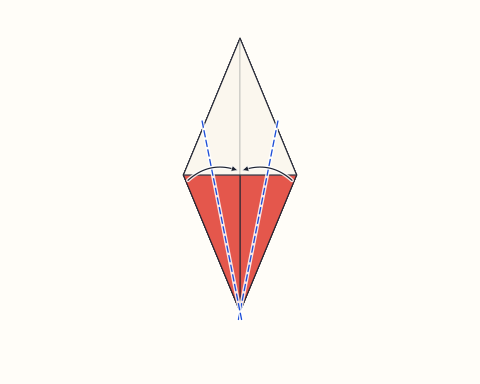
Step 14
Now narrow the bottom half: take the slanted lower edges of the upper layer and lay them along the middle crease.
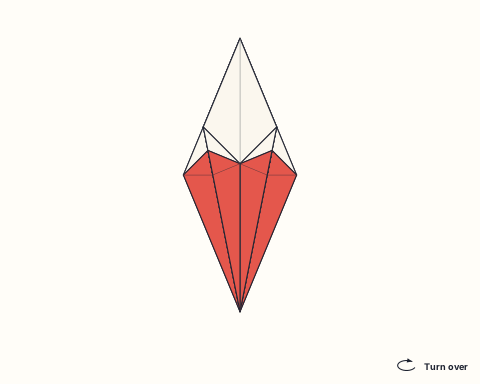
Step 15
Flip the model over.
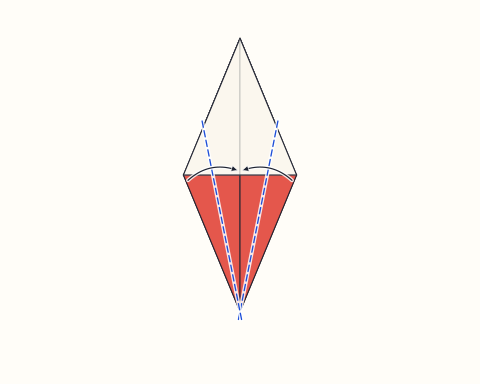
Step 16
Give this side the same treatment, laying its lower edges on the middle crease so both halves match.
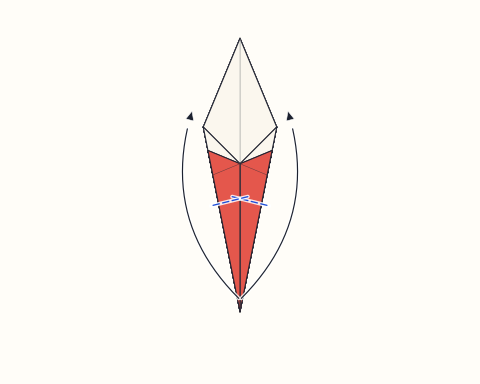
Step 17
Inside reverse fold each skinny lower flap upward between the wing layers: ease the flap open slightly, tuck its bottom end upward inside itself on the crease, and press flat. One point will be the neck and the other the tail.
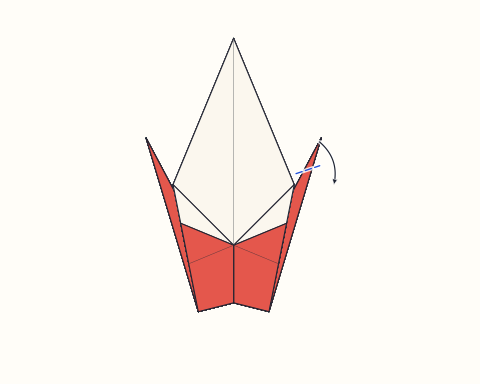
Step 18
Pick one of the two points and inside reverse fold its tip downward to form the head.
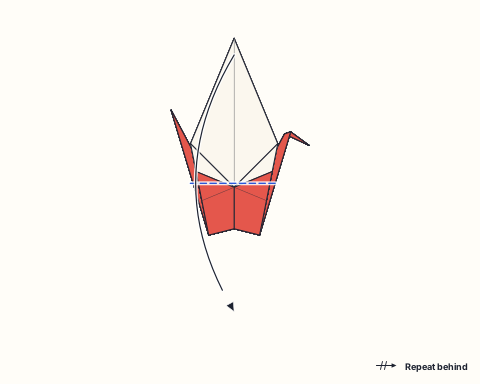
Step 19
Fold the near wing down so its crease runs along the top edge of the body, then fold the far wing down behind to match.
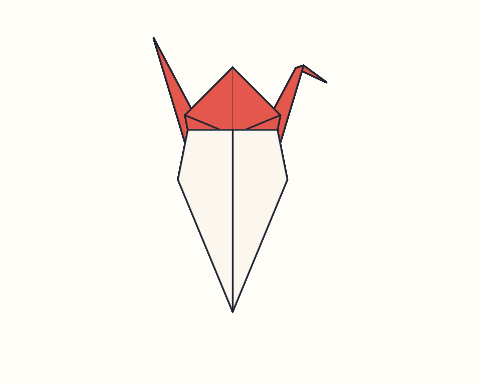
Finished
Grip the neck at its base and the tail, and ease them apart so the body puffs open; then raise the wings outward. In Japan the folded crane, or orizuru, stands for longevity and good fortune.
About the origami paper crane
The orizuru, or folded crane, is probably the most recognized origami model in the world. It is a traditional design with no known inventor, and it has been folded in Japan for centuries. The finished bird has a slender neck, a pointed tail and broad wings, all drawn out of a single uncut square. People fold it as a decoration, as a gift and as a small act of hope, which is why long strings of cranes appear at shrines, weddings, hospitals and memorials. Learning it is often treated as a rite of passage for anyone taking up origami.
As a folding lesson, the crane packs in many core techniques of classic origami. You collapse a preliminary base, perform two petal folds to reach the bird base, slim the lower flaps, and finish with inside reverse folds for the neck, tail and head. Each stage builds on the accuracy of the one before, so the model quietly teaches you to crease carefully from the very first diagonal. Once these moves feel natural, a large share of traditional animals becomes approachable, because many of them start from the same bird base and differ mainly in how the points are shaped.
If the crane feels like a big jump, warm up with the Masu Box, which drills precise edge-to-center folds, and the Butterfly, which introduces collapsing a base from pre-creased paper. After you have folded a few cranes, try smaller squares of 7.5 cm to start a senbazuru string, or use patterned paper and hang several from thread as a mobile. The Lucky Star and Heart make good companions when you want a set of symbolic gifts, and a finished crane looks lovely tucked into a Masu Box as a present.
Origami paper crane: questions
Is the origami crane hard for beginners?+
It is harder than first models like the paper cup or dog face, but many people manage it on the first or second try. The tricky part is the petal fold, which appears twice. Folding a lucky star or masu box first builds the crisp creasing habits that make the crane easier.
What does a paper crane symbolize?+
In Japanese culture the crane is associated with long life and good fortune. A string of one thousand folded cranes, called senbazuru, is traditionally linked to a wish being granted and is often given at weddings or to someone who is ill.
Who was Sadako Sasaki and why are cranes linked to peace?+
Sadako Sasaki was a girl from Hiroshima who developed leukemia after the 1945 atomic bombing and folded paper cranes while in hospital. She died in 1955, and her story made the crane an international symbol of peace. The Children’s Peace Monument in Hiroshima Peace Memorial Park honors her, and visitors still leave strings of cranes there.
What size paper should I use for a crane?+
A 15 cm (6 in) square is standard and comfortable to handle. Smaller squares of 7.5 cm (3 in) work once you know the sequence and are popular for senbazuru strings. Very thick paper makes the bird base bulky, so choose thin paper for small cranes.
Why won’t my crane’s wings flap?+
The flapping version is a different model that keeps the neck and tail unfolded at the bird base stage and pulls the tail to move the wings. This traditional crane is designed to sit still with its body puffed open. If the body will not open, pull the neck and tail apart more gently while pressing lightly on the back.
Fold this next
Butterfly
The origami butterfly is a small model with four wings and a locked body, folded from a square using the waterbomb base. It is a comfortable intermediate model that takes about six minutes and introduces collapsing a base.
Masu Box
The masu box is a traditional Japanese square box folded from a single sheet that locks together without glue. It is an intermediate model that takes about eight minutes, with one three-dimensional step where the walls are raised.

Lucky Star
An origami lucky star is a tiny, puffy five-pointed star made by knotting a long paper strip into a pentagon and wrapping it. It is easy and takes about three minutes, though the final puffing step needs a light touch.
Origami Heart
The origami heart is a flat, symmetrical heart shape folded from one square, ideal for slipping into a card or envelope. It is an easy model that takes around five minutes and uses only simple valley and mountain folds.